Disclaimer: This post is only for study and educational purposes. Please obey the local intellectual property laws and regulations.
Before you start
Before you start exporting Blue Archive’s fantastic 3D modelling assets, you will need the following things to be prepared:
An Android phone with Blue Archive fully installed (which means you can directly go into the lobby scene without downloading anything).
- Installing the MT Manager is recommended, but if you can have direct access to the /storage/emulated/0/Android/data directory, and your system file manager allows you to create compressed package files, then whatever.
A Windows computer with AssetStudio installed.
Here is the release page of AssetStudio.
Step 1: Transfer AssetsBundles
First, you need to go into the /Android/data/com.YostarJP.BlueArchive/files/AssetsBundls directory, and pack all the files in that directory into a compressed package file. Transferring these AssetsBundle files without compressing them is strongly discouraged, as some files will always be occupied for no reason.
After a few minutes of waiting, or maybe seconds if you are using ThunderBolt 4 port (I haven’t tested with my Meizu yet, so I’m not sure), you will have all your AssetsBundles on your computer.
Then all you need to do is to unzip them to a reasonable directory, from which you can easily find them.
Trust me, it is important.
Step 2: Try to find all the assets you need
Let’s take Azusa Shirasu for example ꒰ঌ(🎀⸝⸝ᗜ ` ‸ ´ᗜ⸝⸝🌸)໒꒱💈.
- First, search for “Azusa” in the AssetsBundles folder (assuming that you unzipped it to a folder called “AssetsBundles”).
- You may get two different types of AssetsBundle files: those with a filename containing “Azusa_Original”, and those containing “Azusa_Swimsuit”. For now, we will concentrate on exporting the original characters.
- You may also notice that there will be no results in the folder if you use keywords such as “Mika”, “Ichika” or “Wakamo”. Let’s call this a “404 problem” and we will come back to it later.
- Second, copy all the AssetsBundle files that have “Azusa_Original” in its name to a new folder, and let’s just call it “Azusa_Original”.
- Third, open AssetStudio, select “File->Load Folder”, then select the “Azusa_Original” folder.
- Fourth, when the progress bar reaches the end, select the “Assets List” tab.
Now you should be able to see all the assets in your selected AssetBundles files.
Step 3: Export These Assets
Almost done! Now all you need to do is export these assets to a folder.
But before you start exporting, you should think about what kind of assets you will need.
- If you want to fully customise all the assets by yourself, you can go straight to “Export->All Assets”.
- However, if you want to use the assets exactly as they appear in the original Blue Archive game, then this is the way to do it:
- First click on the “Type” column just above the assets list. This will sort all the assets by their assets type.
- Then select all assets of type “AnimationClip” and “Animator”.
- Then, select “Export->Animator + selected Animation Clips”.
After you have completed the above steps according to your requirements, you will need to select a target folder to save these asset files.
And again, wait for the progress bar to reach its end, you can see all the assets you want in the corresponding folder.
Step 4: Import your assets into Unity
Before starting any of the step below, make sure your Unity project uses URP template. It’s very important. We’ll come back to this later.
Here comes the easy step.
Since we only want the 3D model, go to the “Animator” folder (which would also be the only folder in your assets folder if you chose not to customise anything).
Then select “Azusa_Original” folder (if your “Animator” folder is empty, well, retrying step 3 for a few times might help🤔) and drag it into the Unity Editor’s Project Window.
- The computer may be busy for several minutes due to the massive amount of AnimationClip assets, but eventually it import successfully.
Select the .fbx file and make these two changes in the Inspector:
In the “Model” tab, uncheck the “Convert Units” box at the 3rd line.
Then hit “Apply” button at the bottom right corner.
In the “Materials” tab, switch “Location” to “Use External Materials (Legacy)”, and “Naming” to “From Model’s Material”
Then hit “Apply” button at the bottom right corner.
Then select the .fbx file in the folder and drag it onto the scene. Boom! You now have an Azusa in your game scene!🥰
Wait… Is there something wrong with the model?
You may have noticed that your waifu is “wearing a face mask”. This is because Nexon has compressed all the mouth material into two image files. Finding these two specific .png files can be a pain, but I’ve done it.
- Remember your “AssetsBundles” folder? go back into it.
- Search for “assets-_mx-characters-_mxcommon-_mxdependency”.
- Continue with the 2nd part of step 2.
- As there will be no AnimationClip asset in these AssetBundle files, so just go to “Export->All assets”.
- After selecting a particular folder and exporting, go to the “Texture 2D” folder in that directory.
- There you will find two .png files: “Character_Mouth_2.png” & “Character_Mouth_Black.png”. These are the two files that we need.
- Drag these two .png files into the Unity Editor’s Project Window, and choose a folder to put them in (I personally recommend the “Material” folder).
Now comes the most important part, Shader Graph:
If your project uses the default 3D project template, with the built-in rendering pipeline, you are unable to create a custom shadergraph. So, it is crucial to use the URP template.
Select a directory, create a shader graph using “Right click the Project Window->Create->Shader Graph->URP->Lit Shader Graph”, and name it whatever you want (let’s name it “Mouth” here, since we are going to fix the mouth problem).
With the new shader graph open, you can right click to create a new node, middle click and drag to move the graph around, and left click to edit. Now edit your shader graph and make it exactly like this:
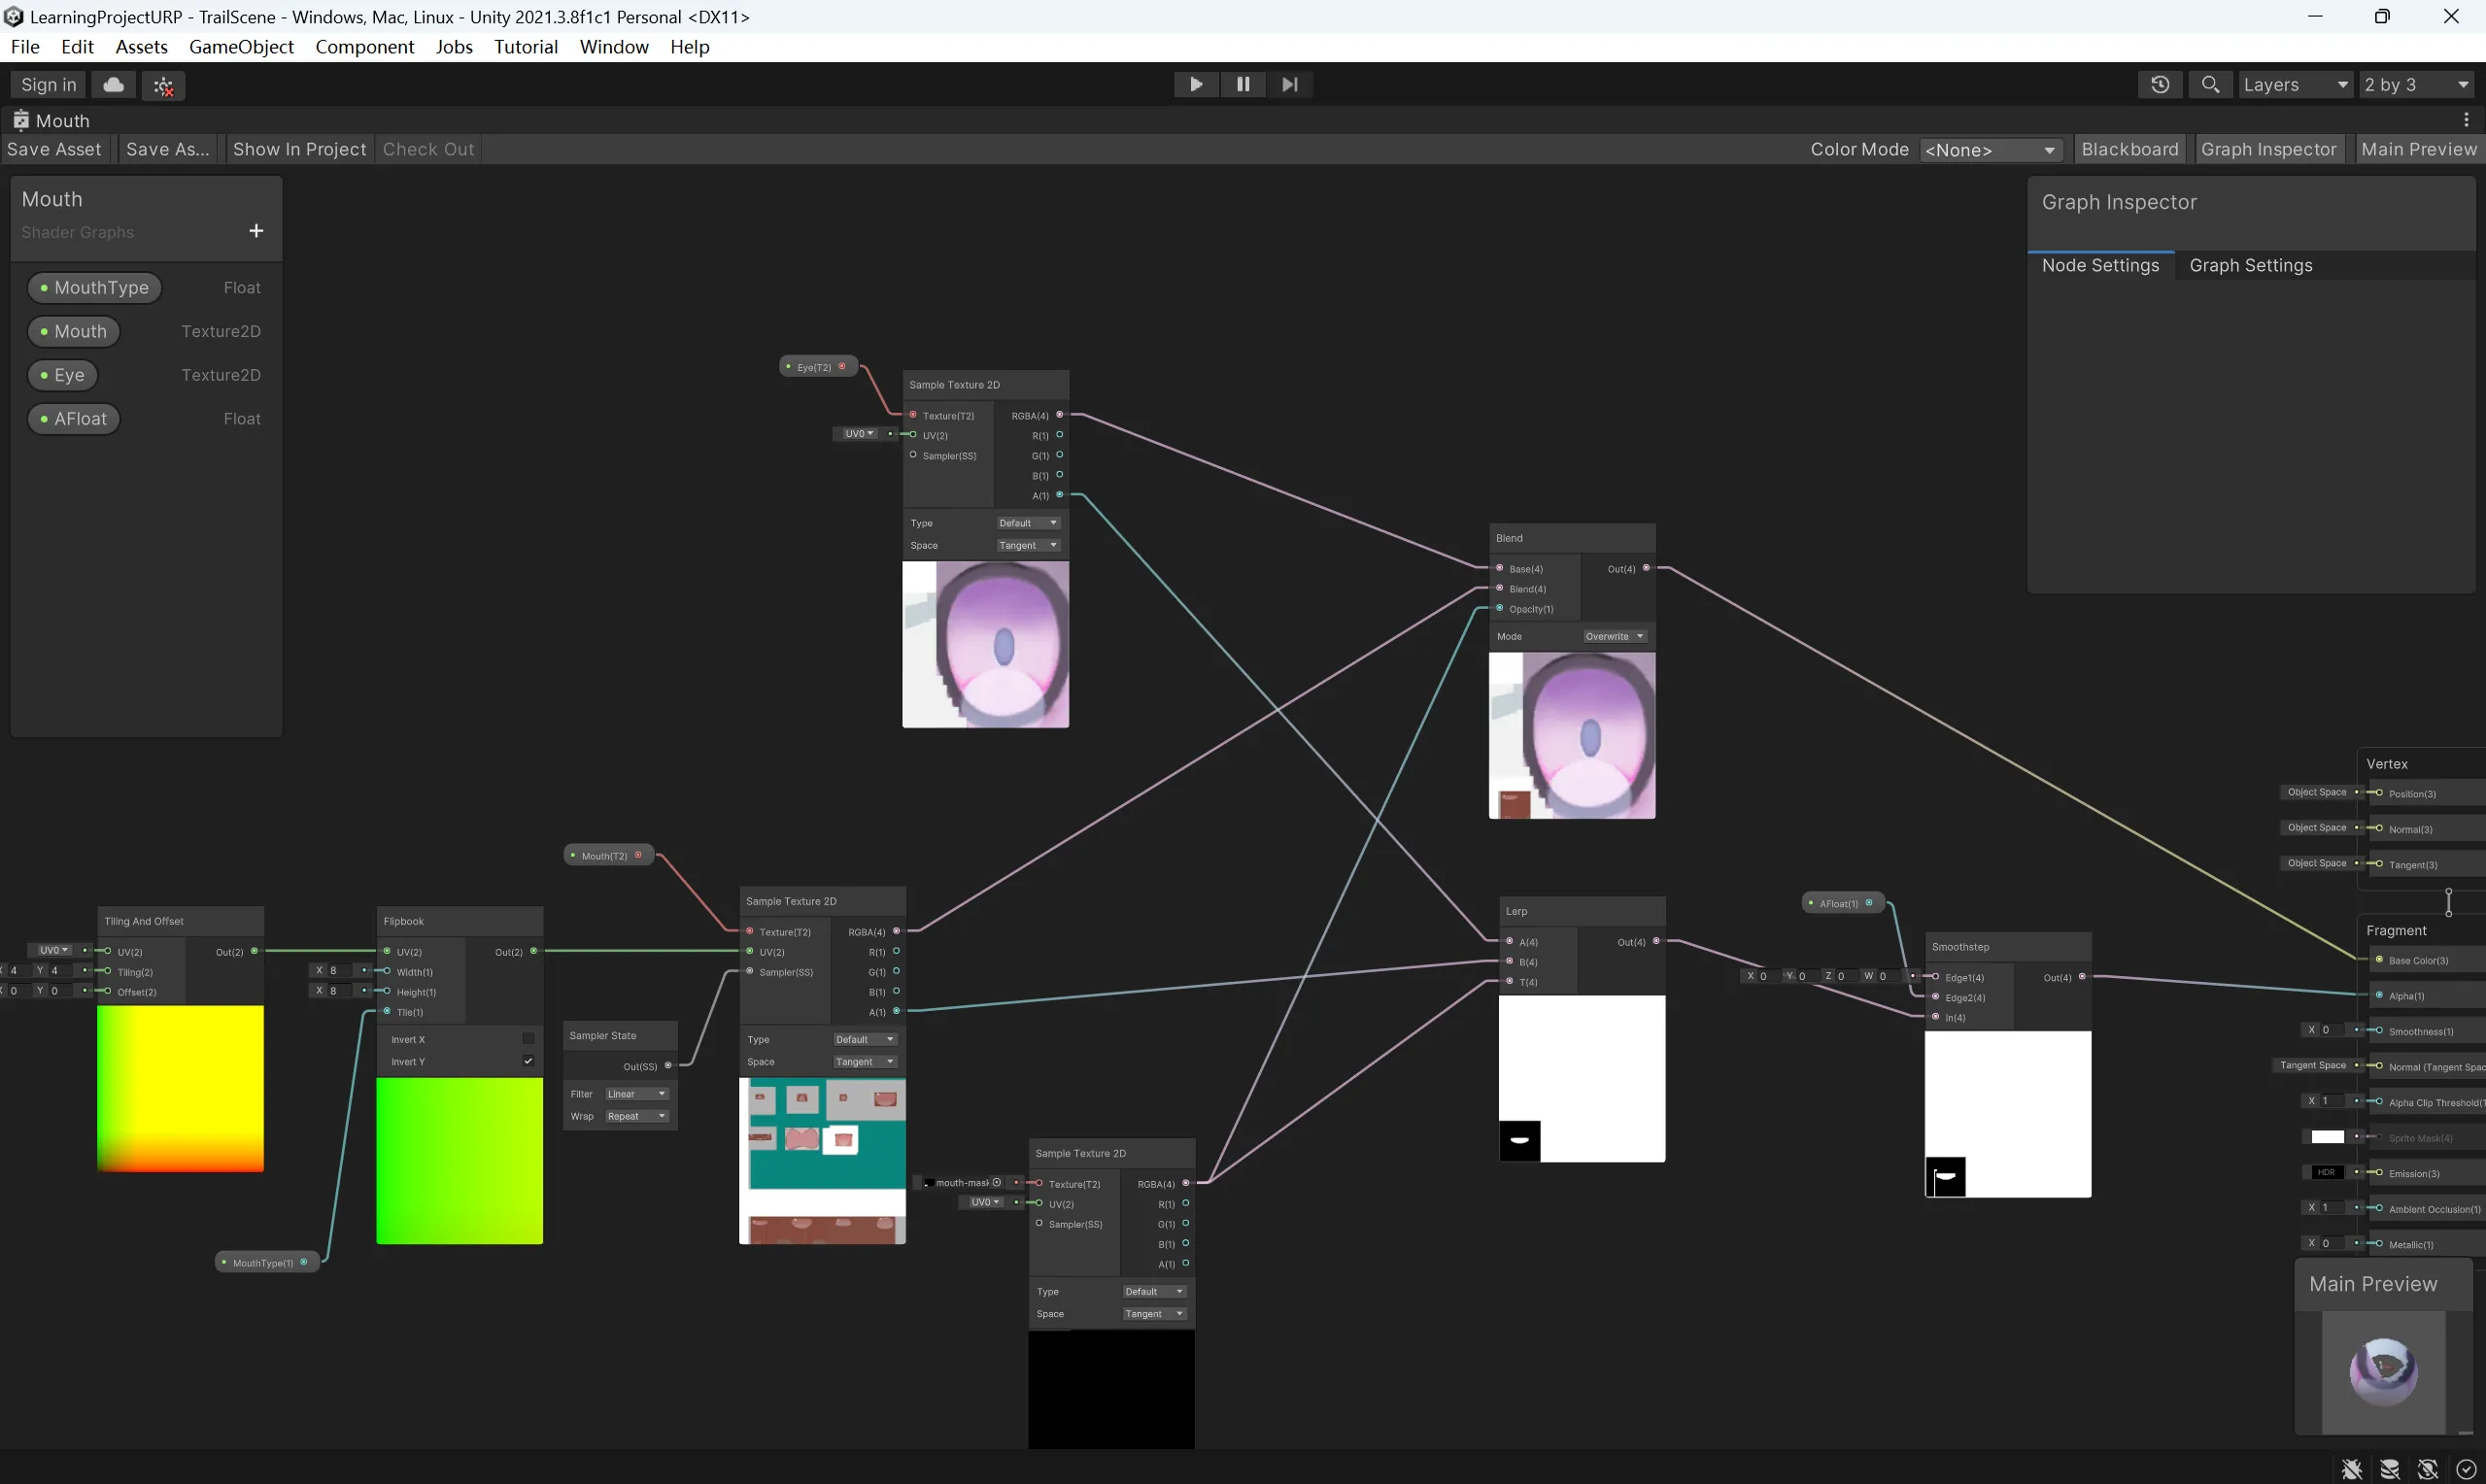
Reminder: When it comes to the “mouth-mask.png” file, you will need Photoshop to create a 256*256 png file, with a 64*64 square painted #FFFFFF at the bottom left, and the rest of the image painted #000000.
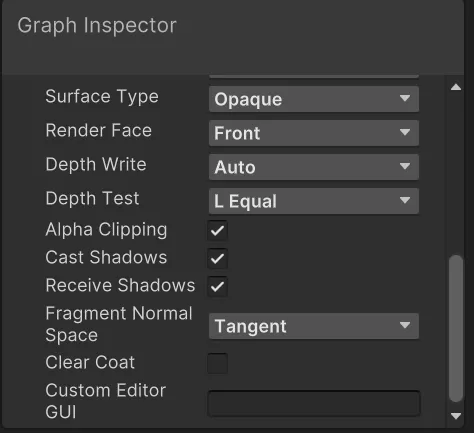
Select “Graph Settings” from the Graph Inspector in the top right corner of the Shader Editor. Make sure that “Alpha Clipping” is checked.
Go into the “Material” folder, which is in the same folder as your .fbx model. There you will find a material ball called “Azusa_Original_Eye Mouth”. Change its shader to “Shader Graphs/Mouth” by directly searching for “Mouth” in the search bar.
After all the hard work you have done, the mouth problem should be fixed.
So… What about the “404 problem”?
As I mentioned earlier, you may encounter some problems when trying to export assets of some students. For example, Mika Misono or Hanako Urawa (Swimsuit). It seems like they don’t have an AssetsBundle file here, right? Well, here’s the solution:
- Go to the “AssetsBundles” folder, and search for “charactercollect”.
- Copy all the results into a new folder (let’s call it “charactercollect”).
- Export the assets in these AssetsBundle files as per the steps above.
- Go into the “Texture 2D” folder in that folder.
Here you will see each existing student portrait with their name/code as a part of the filename. With this information, you can go back to the “AssetsBundles” folder to find the corresponding code, grab the files, and export assets just as original characters.
Important Things to Know about Multi-version Students and Special Students
Multi-version Students
Despite being a brand new character, some assets/materials used by the new version of students are still from original version. For example, eye materials. So, it is important to export both the original and new versions of student’s assets to get all the materials attached. For example, if you export Azusa (Swimsuit ver.) separately, you will lose the eye material, whereas exporting all assets from both Azusa and Azusa (Swimsuit ver.) won’t cause this problem.
Special Students
It is important to note that Special Students, who don’t run through the level as Striker Students in the original Blue Archive game, have no Animator or AnimationClip assets to attach to the model. Maybe exporting all the assets and binding them manually could be a solution, but I have no idea if this is possible.
Special Thanks
- Thanks to @浅草疏影 for the article on Bilibili about how to export Blue Archive assets.
- Thanks to @Gijtsusha for offering solutions for fixing the mouth material problem and taking the time to answer my questions.
- Thanks to @Kinrain for helping me fix the shader graph.